Week 1: Assignment 14| Using Flash
Objectives:
In this assignment you’ll learn…
Recall the advantages and disadvantages of using a camera’s built-in flash.
Student Activities (online work): Read, Watch Video & Practice
1. Read the textbook: Chapter 12- Complete: Technical Terms, Review Questions & Workbook
2. LinkedIn Learning Video:Photography Foundations: Flash
Practice: Bounce Flash; What is due? 12-24 Bounce Flash, Fill Flash and Direct Flash pictures
Bounce flash photography is the use of an external flash unit (also known as hot shoe-mounted flash) to reflect the appropriate amount of light onto your subject so that your shot appears bright and sharp. The external flash unit has a rotatable head that can be adjusted to face a wall or ceiling. When the flash is triggered, light is reflected off those surfaces, which diffuses and softens the light from the Speedlite. Bounce flash photography is extremely useful especially for indoor photography. The key to achieve good results in bounce photography is the bounce angle. The angles which you can adjust the flash head differs depending on the model of Speedlite being used. The flash head can be positioned to face up, down, left or right. Varying the angles of the flash head will result in light illuminating the subject in different ways. In class we use the Profoto A1. Here is a Step by Step Walk Through PROFOTO
Direct Flash: Direct flash refers to a very particular type of artificial lighting: You point your flash at the subject. You don’t add any modifiers (such as umbrellas or softboxes). You make sure the flash is lined up with the camera (so that the lens and the flash are both pointed in the exact same direction).You take a shot. It’ll give you a very bright, very harsh, in-your-face type look.
Fill Flash: It’s any light, a flash or otherwise, used to compliment another light source. It is often used to add light to shadow areas or when your subject is backlit. Fill flash is not used to overpower other sources affecting your subject. Instead, its job is to reduce shadows caused by stronger light. When your subject is lit from behind this often results in it appearing too dark in photos. This is because the exposure meter reads the light from the background and not from your subject. By using flash you can balance the light on your subject with the light in the background. This way both your subject and the background will be well exposed.
Photo Assignment:
Take 12 images of each demonstrating Bounce Flash, Fill Flash and Direct Flash pictures
Welcome to the Studio
In class we use Paul C Buff, Inc Studio Lights. Learn about the studio lights….
 Watch: DigiBee Demo
 Watch: AlienBees™ Product Demo
 Watch: White lightning x800 & x1600
Introduction
Controlling light is the main aspect of photography lighting techniques. Softboxes and umbrellas are the well-known light modifiers, they are used to soften and diffuse the light source by spreading the initial beam to create a larger light source. Both of these modification tools are generally portable solutions that can be adapted to a range of light types, from external camera flashes to the most powerful studio flash packs, they are parts of both home photography studio and professional studio. The question is not which one is better, but I think which one is suitable for a specific situation. Trying to choose which type of light modifier to use for your next shoot really comes down to what effects you want to achieve in your photo.
Softboxes are used for softening, diffusing light sources and increasing the size of the light source; A softbox controls the shape and direction of light more than an umbrella and prevents more light spill from occurring. They are able to produce natural-looking light by mimicking the shape of a window. Softboxes come in a variety of different shapes, sizes, and colors, each good for different purposes.
The shape of a softbox can influence the look when applied in portrait photography. When photographing people from close range, the shape of the used light source can often be seen reflected in the subjects eyes (called “catch” lights). The different shapes of softboxes are:
Rectangular and square. These can be used for just about anything, from Key/Main Lights to Fill Lights.
Strip box:This is a skinny rectangular softbox. Its narrow shape makes it good for casting rim/Hair Lights on subjects without affecting other parts of the image.
Octobox: A softbox with 8 sides. Its rounded shape will cast natural looking catchlights in the eyes of your subject, making this a great choice for your key Light.
Honeycomb Grids: help to eliminate fall-off by directing the light into a straight beam. We use it for the background light. We use the silver metal reflector that came with it to control the light spill. I also alternate between four different honeycomb grids, 10° – 40°.
Umbrella’s
Umbrellas are usually the first light modifiers that people buy when they begin shooting with their flash off-camera. They produce broader, diffused lighting (similar to outdoor light) that is uncontrolled and uncontained. Let’s take a look at the different types of umbrellas and the many options they give you.
Transparent Umbrella– They are made with a plain, white, and semi-translucent material. To diffuse light with these umbrellas, you need to point the outside part of the umbrella at your subject and shoot the light source into the opening so that the light passes through the translucent material, making it much softer. If you’re shooting with a flash or Strobe, your light source is basically a few square centimeters. This umbrella takes that light source and spreads it out; giving you softer light without the harsh shadows that a bare flash will give you.
The shoot-through umbrella also gives you versatility; you can bring it close to a person’s face for a great classic portrait, or pull it back to spread the light into the rest of the scene. You can get two of these and use one for your key light and one for your fill light. With this simple, inexpensive setup you can make great, professionally lit portraits.
Reflective umbrellas, your light source is directed into the opening side of the umbrella, and the light bounces back onto the subject. When used in this traditional position, they produce indirect, bounced light. Reflective umbrellas allow you to move the light source further from your subject without losing much of the light from your flash. This is great for full-body or group portraits. Because the light is only being reflected you have much more control of where your light lands.
As a general rule, the larger your umbrella, the larger your light source, and the softer your light. Reflective photo umbrellas come in three colors: gold, silver, and white. Silver and white are the most commonly used, although gold has its place as well.
- Silver reflective umbrellas are going to reflect most of the source light (least light loss) and It is great if you want cool light.
- Gold umbrella will consume a little more light, and it is perfect for warming up your flash’s light.
- White umbrella’s eat the most light, but it will give you the softest light, but remember, you will need to increase the power of your light source compared to shooting into a silver or gold umbrella.
HOW DO I GET THE LIGHTS TO FIRE?
In addition these fabulous lights, you’ll need a few more things. We use the Cybersync trigger which goes on my camera and the Cybersync AC powered receiver that goes on the strobes.

You’ll also need a sync cord. The sync cord plugs into both the receiver and the strobe and allows them to talk to each other. You could also plug the sync cord directly from the strobe into your camera and trigger it that way. You’d have to get a really long sync cord though and I for one would trip right over it!
Hard light
Hard lights are most easily identified by the shadows that they cast rather than the way they rest upon a subject. Anything illuminated by the rays of a hard light will be accompanied by a clear, dark silhouette of a shadow.
Hard light is often considered to be not very good light, although it depends entirely on the look you’re after. Hard light can work extremely well for some images and ideas. The photo below shows a case where using hard light gives a more dramatic effect to the photo.

Soft light
Soft light is generally considered to be more friendly and flattering to your subjects. It’s used often with portraits. The images are meant to be inviting, warm and welcoming. A soft light produces the opposite effect as the shadow loses definition and becomes more muted. The photo above shows less or no shadows in the photo.
Two factors affecting the softness of light: The first is the size of the light source in relation to the subject. The larger the light source, the softer the light being cast on the subject will be.
The second factor is the distance between the light source and the subject. The farther a light source is placed from the subject, the harder the light will become.
Week 2: Assignment 15| Studio Product with Texture
Objectives:
In this chapter you’ll learn…
The goal for this assignment is for you to get use to using the studio lights and light meter.
Student Activities (online work): Read, Watch Video & Practice
1. Read the textbook: Chapter 10- Complete: Technical Terms, Review Questions & Workbook
Photo Assignment:

Week 3 & 4: Assignment 16| Introduction to Portraits
Objectives:
In this chapter you’ll learn…
Describe the various types of portrait and studio photography.
Demonstrate the use of white balance settings to provide a warming or cooling effect on light being recorded by a digital camera.
Identify situations in which fill flash should be used.
Discuss the techniques for controlling light in the studio.
Apply the basic techniques of studio lighting for both portrait and product photography.
Student Activities (online work): Read, Watch Video & Practice
1. Read the textbook: Chapter 15 and complete workbook
2. Watch: LinkedIn Learning Video: Lighting for Photographers: Portraiture with Natalie Fobes

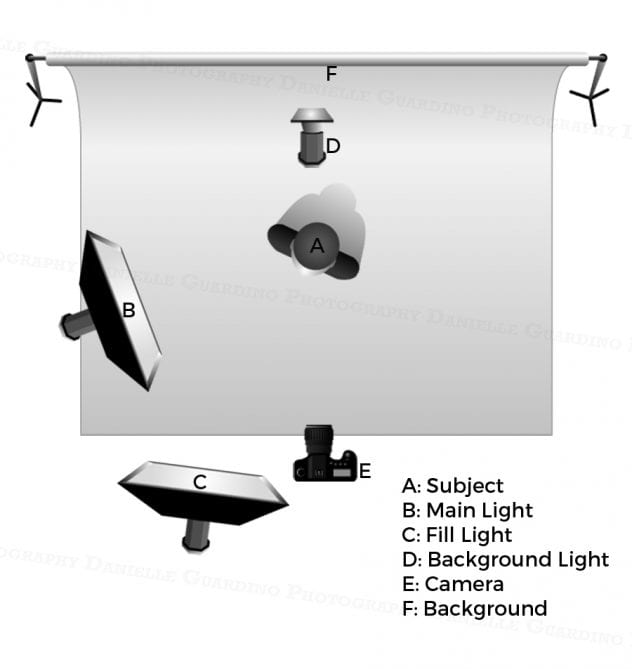
STEP 1: Pick an aperture for the MAIN LIGHT.STEP 2: Set your FILL LIGHT 1.5 stops less than your main light.STEP 3: Set your BACKGROUND LIGHT 1 stops less than your main light.(Start out using f/16 as your main light, f/8.5 as the fill light and f/11 as the background light.)
Photo Assignment:
Take 12-24 images that demonstrate studio portraits using short lighting, broad lighting, and butterfly lighting. For each lighting set up, you need to use 3 different apertures.
Rembrandt lighting gets its name from the lighting in Dutch painter Rembrandt van Rjin’s paintings, which used skylights and high-up windows to illuminate his subjects. This became a very common light pattern in his paintings. This lighting technique is known for creating a triangle of light on the subject’s cheek. Rembrandt Lighting is light on one half of the face, and a triangle of light on the shadowed side of the face that is called ‘the triangle shadow’. If it’s ‘real’ Rembrandt lighting, the triangle shadow should be no wider than the eye, and no longer than the nose. Rembrandt lighting at its most basic level is constructed with a single light source placed approximately 45 degrees from the axis of the nose, with an approximately 45 degree downward deflection, lighting the side of the face that is farthest from the camera.
 Introduction to Short Lighting:
Short lighting is when the subject is posed such that the main light is directed at the side of the face that is furthest away from the camera. It is easily identified by the triangle shape highlight that is formed on the subject’s near cheek. This lighting is flattering to most people because of it ability to slenderize its subject’s face.
Main Light:____f/2.8______
Fill Light:_____________
Background Light:___________
Main Light:____f/8______
Fill Light:_____________
Background Light:_________
Main Light:____f/22_____
Fill Light:_____________
Background Light:___________
 Introduction to Broad Lighting:
Broad Lighting is when a subject is posed in such a way that the main light is directed at the side of the face that is closest to the camera. Broad lighting can add weight to a thin face, but it does this by ‘adding’ roundness/thickness to the face, so it is not a good style of lighting to use with bigger subjects (or any subjects with round faces.)
Main Light:____f/2.8______
Fill Light:_____________
Background Light:___________
Main Light:____f/8______
Fill Light:_____________
Background Light:_________
Main Light:____f/22_____
Fill Light:_____________
Background Light:___________
Introduction to Butterfly Lighting:
Butterfly Lighting is a style of lighting used primarily in fashion photography. It consists of a single light pointed directly at the subject straight on, and raised high enough to create a downward shadow on the subject. This causes a little ‘butterfly’ shadow to appear directly underneath the subject’s nose. Often the Butterfly Lighting setup is augmented by a reflector or fill light in front of the subject, underneath and just outside the frame of the shot to bounce some light up into the eyes because a light at such a high camera angle generally causes the eyes to go very dark without it.
Main Light:____f/2.8______
Fill Light:_____________
Background Light:___________
Main Light:____f/8______
Fill Light:_____________
Background Light:_________
Main Light:____f/22_____
Fill Light:_____________
Background Light:___________
Week 5 & 6: Assignment 17|Color Theory
Objectives:
In this assignment you’ll learn…
Take contrasting and monochromatic colors portraits and products.
Student Activities (online work): Read, Watch Video & Practice
1. Read the textbook: Chapter
Monochromatic colors are different tones of the same color. If something is monochromatic, it contains just one color. When we talk about monochromatic colors, we are referring to all of the hues of one color.


Contrasting colors are opposite colors on the color wheel. Color contrast involves the relationship between colors on the color wheel. Warm and cool colors contrast with each other. Colors that are opposite each other on the color wheel (red and green, blue and orange, and yellow and purple) are known as complementary colors.  Take two product or still life photographs, one photograph using contrasting colors and one photograph using monochromatic colors. Take two portraits or fashion type studio photographs. One photograph using contrasting colors and one photograph using monochromatic colors. You must use a hair light and shoot ¾ or full body portraits.*BLACK & WHITE ARE NOT COLORS!
Photo Assignment: Contrasting and Monochromatic Colors.
You must use a hair light and shoot ¾ or full body portraits. Once done make a contact sheet of your work.
Week 7 & 8: Assignment 18| Mr. Jim’s Advertising Agency
Objectives:
In this assignment you’ll learn…
• An advertising agency organization that creates advertising material, contracts for publication space, and sometimes undertakes market research on behalf of its clients.

Photo Assignment:
You have just signed a contract with Mr. Jim’s Advertising Agency. Their customers sell watches and eyeglasses/sunglasses. The agency wants to see examples of the type of photography you will take for them.
YouTube Video: Luxury Watch Photography
YouTube Video: Watch Photography Tutorial
YouTube Video: Ray-Ban Sunglasses Photography Tutorial – Part 1 YouTube Video: Ray-Ban Sunglasses Photography Tutorial – Part 2
- Research to find appropriate example photographs to show your client. After approval from the agency take a photograph of one of their products to be used in an advertising campaign. The photograph must be commercial quality to be used in your portfolio.
- You must shoot 12-24 images and make a contact sheet of your work.
- Photos must be of saleable quality, showing good subject, composition, lighting and exposure.
Week 9 & 10: Assignment 19|High Key/Low Key
Objectives:
In this assignment you’ll learn…
An advertising agency organization that creates advertising material, contracts for
publication space, and sometimes undertakes market research on behalf of its clients.

High Key images are pictures that are overall very bright and have “lot of white in them”. The high key image appears “overexposed” ie. very light, however, obviously, there should be no actual overexposure (such as a complete “white out” or loss of details in the highlights). The goal is to evenly light the background so that it is not noticeable or at least not prominent. The background should be at least one to two stops brighter than your subject.

Low Key images are pretty much the direct opposite of high-key ones. Appearing “underexposed” or dark, without actual underexposure and loss of details in relevant areas, they use high contrast to illuminate contours of a subject in order to emphasize its form. This results in very moody and edgy images, with lots of mystery and drama.
Watch: YouTube Video: Photo Shoot: Low Key Lighting
Watch: YouTube Video: HOW I GOT THE SHOT | Creating a High Key Portrait with Anthony Romano
Photo Assignment: High Key / Low Key Portraits
1. Research High Key /Low Key lighting.
2. Take studio portraits demonstrating High Key /Low Key lighting.
3. You must shoot 12-24 images and make a contact sheet of your work.